Wednesday, November 13, 2013

New beginnings

Its been so long since I posted, I doubt if anyone will remember this blog is here.
I have been making some new jewelry items, mostly sideways cross bracelets which seem to be a very popular item right now.
Posting some shots so you can see what I am talking about.  They aren't that clear,but I think you can figure out the gist of things.  I need to read up on how to be a better photgrapher, since I have this really nice camera and no brain to use it right.  :-)
Hope you all are having a great week.  It's been so cold here, not much to do besides stay inside and try to keep warm.


Thursday, July 19, 2012

Stars and more

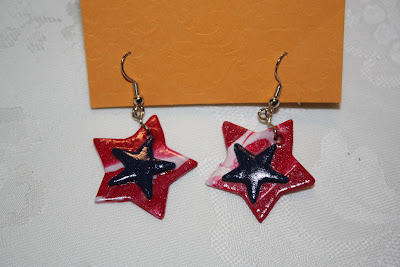
Short little post tonight.  Some pics of polymer clay stars I've made.  There are ornaments for hanging on a tree or rearview mirror (or wherever else you need a star).  Some have been made into earrings, others into necklaces.  Just a variety, mixing it up.  See what you think.


Wednesday, July 18, 2012

Earrings

Thought I would post some pictures of earrings tonight.  Some I made with polymer clay pieces, others were made using findings that I've picked up here and there.


More to come tomorrow.  Stay tuned.....

Tuesday, July 17, 2012

A little change

Hey there!
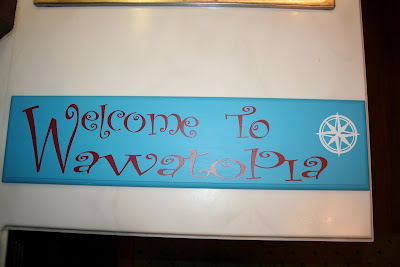
I've been posting a lot of jewelry lately but in this post I am going to show you a sign that I created for my sister and her husband.  I took pictures along the way as I was making it, in hopes of being able to show step-by-step how I accomplished the end-game.  Enjoy.

I started with a plain board sign that I had purchased some time ago from Uppercase Living.  It had some sticker words on it that I removed for this project.


I painted a base coat of simple white acrylic paint, to start the project with a clean slate.


Next, I added a couple coats of Americana's Turquoise Blue acrylic paint.  I love this color!


Then I went and designed a layout in Sure-Cuts-A-Lot (SCAL) for my Cricut.  I wanted the sign to work in my sister's lake house, which they nicknamed Wawatopia.  It also had to accomodate their decorating sense and nautical colors. 
After much consideration, this is the design I came up with.


 I cut the design out of a deep red vinyl that I had on hand.
The Nautical logo came from the Cricut "Graphically Speaking" cartridge.


Once I had the design cut and applied to the sign, I then used an opaque marker and added some white accents where I felt they were needed.
This step really made the letters pop and I'm glad I did it.


When I got to this point, I decided that the sign needed some texture, so I went out on a limb and covered the whole thing using Ranger's Crackle Accents (and prayed that it would look good in the morning!).

Viola, it worked and looked awesome.


 I made this picture x-large in hopes of showing the detail from adding the crackle coating.


Here is the final product, sorry for the flash.


Hope it gives you some inspiration to reuse/redo something in your house that you aren't enjoying as much as you could.  This was  really inexpensive way to accomplish that and have a terrific gift to give as well.
Thanks for looking!

Wednesday, July 11, 2012

More polymer clay pieces

I am trying to be faithful and post to this blog every day, though it may be tough until I start taking some more pictures!  I am running out of them.

First picture is of a black and green cane necklace and a bracelet made with the leftover clay from making the canes for the necklace.  I used black seed beads between the cubes and the beads on the necklace.  The chain is a simple black chain that I think I got at Michaels.
The bracelet is a stretchy cord with clay beads and black seed beads between the clay beads.  I just knotted the cord together at the ends to complete the bracelet.


This next piece is a pretty little combination of black & white polymer clay beads that I made and used clear seed beads as spacers to form the necklace.  The chain is silver.  This is a really feminine piece that would go with so many different things.


Here are a few pictures of the many different necklaces I made using one batch of polymer clay beads (that I also made).  I really love these beads, I think they are my favorite so far.
This first one is made using a cool black and white chain.


 This is just a close-up of the beads that are on that necklace.


Here I used a black circle chain and more of the same batch of beads.

 A close-up of those beads.

One more necklace using those same beads.  On this one I just used a wide link silver chain.


These next couple of pictures are of a necklace I made using a polymer clay charm, two strands of leather cord and some wrapped wire.
To create the charm I conditioned the clay, cut it into a square, stamped the design on it and baked it.  When it was done baking, I used acrylic paint to bring out the detail of the design.  I painted it on and then wiped most of it away.  Lastly I gave it a coat of glaze to seal it all up.
I attached a bale to the back to hang it from the leather cord.
Once I had the lengths of the cord like I wanted it, I used 20g wire to wrap around the cord and hold it together in places.  I loved the way it turned out.
And oh yeah, I almost forgot.  There are also a few silver spacer beads on this one, in the places where I attached and wound the wire.


 A close-up of the charm.


So on this last necklace, I used a long leather necklace that one of my sons' girlfriends was done wearing, and repurposed it into the cord for this piece.
I made a clay charm just like I did the flower charm above, only this time I made the charm thicker and shaped it into a rectangle.  I then stamped a nautical design on this one.
Once baked and dried, I again used the acrylic paint technique, wiping it off after getting it in the main parts of the design, and then finished with a clear coat.
I then strung wire through the piece in two places (top and bottom), adding a couple of clear beads to each end.  I then made a circle of the wire, attaching a couple of silver star charms, and used the wire to create the bail that ties it all together.


This is a close-up of the charm.


Thanks for looking.  Hope to see you back soon!

Tuesday, July 10, 2012

A little metal

As promised yesterday, today I am going to post some pictures of a few of the items I've made that have metal and polymer clay pieces (as well as other embellishments).
This first piece was made with a two-sided bezel that I put a sparkly heart cutout in, one on each side of the bezel, and then finished each side off with Glossy Accents (you can tell I use this product a LOT, I love it).
 It has a leather cord and a simple silver clasp as a fastener.  I added some silver bead spacers and a couple of really neat blingy-thingys that sparkle and shine when the light hits them.

Here's a close up of the charms:


This next piece is a bracelet made by starting with heavy copper chain and adding some really cool accents.  It has some of Tim Holtz' Muse Tokens ("Unique" and "Thoughts", carefully chosen), a gear and some simple small copper-based tokens.


The finishing piece on this one is a beautiful heart closure from Blue Moon Beads.  This is one of my favorites.  Trendy, yet still wearable by an old gal like me.  :-)


Up next, a whimsical bracelet with a "sealife" theme.


It has a sea horse, a frog, a couple of fish and a turtle as charms.  I made this picture XL in hopes that you might be able to see it.
It also has three word charms.  One says "Create", one says "Imagine" and one says "Dream".
I made this one XL too, I'm on a roll. 


This next piece is a little bracelet that was actually one of my first clay pieces ever.  I worked on wrapping the wire around the cord, hoping to make it "perfect" and just never was satisfied with it.  Then my sweet friend Maegan came and picked it out of all the pieces on the table and said she loved it. 
That made me realize that "perfect" isn't always the best game in town. 
She helped wrap some more wire to finish it off and it was the second piece sold at the festival.  I guess I will plan to make some more like it.  Although no two pieces will ever be alike....


These next two pieces are really cool necklaces that I hope you like too.  They are more along the order of what I want to concentrate on and try to get better at building.  I love the length of the chains and the "conversation starter" pieces that make them unique.

The "Spread Sunshine" charm is a polymer clay piece I made, the rest of the pieces on this particular necklace are all purchased items that I bought at Michaels, JoAnn and Hobby Lobby.


So last piece for this post, the "Simplify" necklace.  I'm not sure these uploaded pictures are going to do this justice, but it is really awesome.

The big blue leaf is a handmade polymer clay piece I made.  The rest of the items are from Tim Holtz' line and Blue Moon Bead.

As always, I really appreciate your visit to this site and hope that you will leave some comments to help me out.